3D Printed Version WB2HOL 2m Tape Measure Yagi
Photo 1.
This has been re-designed using a 3D printer to make the three element
brackets that hold the elements of the antenna. This is another of the
many designs of the WB2HOL 2m tape measure yagi, This shows a great
piece of lateral thinking and clever design. It is also is proven to be
highly practical for foxhunts and ARDF. The elements will withstand
those reckless charges through the undergrowth in pursuit of the fox,
they also make it easy to get the beam in and out of the car with
little risk of damaging either the car or the antenna.
Looking at the way the original yagi was built, this is an alternative
design if you have a 3D printer.
The original WB2HOL design is unbeatable for simplicity, but as the
3D printer designers came up with this design, I printed it out to see
how easy it was to do.
DO NOT print these parts using PLA+
You will need to print out these brackets using PTEG as this is not
only UV protected but a stronger material. If you use PLA then what
will happen is when you go to tighten down to the 20mm pipe, it will
crack and split. As I used the same 20mm conduit pipe in the previous
design, I cut 3 pieces of dowel about 8cm long and pushed it down the
pipe for support to mount the brackets using wood screws. I measured
how far in it needed to go for the driven element and reflector.
With the re-design it does require some correct measuring and drilling
to make sure the elements and boom are straight.
This has to be done reasonably carefully, to ensure correct alignment
of the elements.
Using the 25mm (1") 8m tape measure, is a lot cheaper to buy over the 5
metre tape measures.
Bunning or Mitre 10 DIY stores should sell either a budget 5m or 8m
tape for around $3 to $5.
You only need around 3 meters
I have referenced stock items in Bunning but Mitre 10 should have their
version.
The dimensions of the beam are shown in photo 1. These have been scaled
up from the original design for operation at 145mHz. This frequency is
mid way between the clubs foxhunt channel (145.425) and the IARU ARDF
band (144.5-144.8).
The scaling was done using the same software as used by Joe WB2HOL to
so all credit goes to him for the original design.
I found it necessary to reduce the length of the hairpin coil from 5"
to 4", probably because the coax and hairpin connection points were on
opposite edges of the tape elements.
CONSTRUCTION.
BOOM
Cut the boom at least 800mm long, (The extra will be to give an
extended handle and to hold the attenuator box).
Mark the fixing points for the elements. I marked the director's
element saddle first (front and back) and measured the distance for the
driven element's saddle also marking the front and back of the saddle.
and finally doing the same for the reflector's saddle.
Once these elements get assembled, they will slide down the boom to
the marks already made on the boom.
Add a T piece to the boom which will make a handle and fit a small
piece of conduit to allow the attenuator box.
ELEMENT SUPPORTS
Tip: - make a template up, for marking and drilling the element
fixing holes from a scrap piece of material, about 100mm long.
This can be either plastic or wood.
I cut 2 pieces of conduit of 100mm and cut them lengthways.
I drew a pencil line down the pipe and cut carefully using a angle
grinder with a 1mm disc.
These will be for the three bottom element supports. The forth I used as
a template as it was spare.
I flattened each cross section of the pipe in a vice bit by bit to make
it near flat. This will hold the tape measure element onto the saddle
clip.
Find the center of the saddle clip and then drill a 4mm hole. This is to
hold the element to the boom when assembled.
Drill out the two holes on the saddles to 4mm
I used 4mm pop rivets to hold everything together.
TAPE ELEMENTS
Cut the 4 lengths of tape measure steel carefully to length, using a
sharp pair of scissors (don't tell the XYL!). Chamfer off the corners
at the cut ends for safety. Forming the holes in the tape is a breeze
if you have a leather hole punch tool. You will need to secure a
suitably sized washer to the anvil to punch through the tape.
If you do not have a punch, try starting with a pin hole then ream the
hole out to the required size.
Take the paint off the underside inside corners of the driven element
halves. Tin with solder. Form the hairpin match from stiff wire round
some 22mm pipe. The length of wire of the hairpin is 100mm plus 6mm
each end for the solder legs (112mm total or 4").
To assemble the elements, use 4mm x 25mm bolts with shake-proof washers.
Bolt on the PVC wall clips to the bottom of the boom wall , but don't
tighten at first as the fixing lugs will spread and make it difficult
to fix align the holes in the element support components. Add a
double-sided sticky pad to the underside of each element half and
attach the driven elements to the element bottom support. The pads
will prevent the possibility of the driven element half rotating around
the single bolt fixing.
Solder on the hairpin and coax feed and secure both to the boom with
cable ties. Cover the sharp cut ends of the elements with insulation
tape or similar, to protect users and passers-by. You can use a piece
of velcro tape on the ends of each element and matching pieces on the
top element clamps, this provide's a means of 'folding' the elements for
safely transporting the antenna.
BALUN
Photo left.
Not everyone has found the need for a balun, but if you do, 7 turns of
the coax feed wound round the boom does the trick.
Material List
Boom
20mm Conduit pvc pipe 1200mm min See text
Element supports
2x 20mm PVC pipe 100mm cut lengthways in half
1x 20mm Grey Conduit Fittings Inspection Tee (Bunning I/N:0235125)
(come in packs of 2)
Elements
1x 8m steel measure tape 25mm (craftRight)(Approximately 3 meters
Minimum required) (Bunning I/N: 5660481)
3x 20mm Grey Conduit Fittings PVC Mounting Saddle (Bunning I/N: 0235097)
(come in packs of 2)
Misc
25x25mm Velcro adhesive pads x6. (optional)
15x 4mm Blind Pop Rivets
12x Washers to strengthen steel tape measure.
2x Conduit Plug caps (Optional for ends of the boom)(come in packs of
2)
2x 20mm Grey Conduit Fittings Mounting Clip (Bunning I/N: 0235100)
(come in packs of 2)
Insulation Tape (Optional required if fitting balun)
Feed / Matching Stiff Wire 112mm
Coax & plug
 Photo 1. Diagram and measurements.
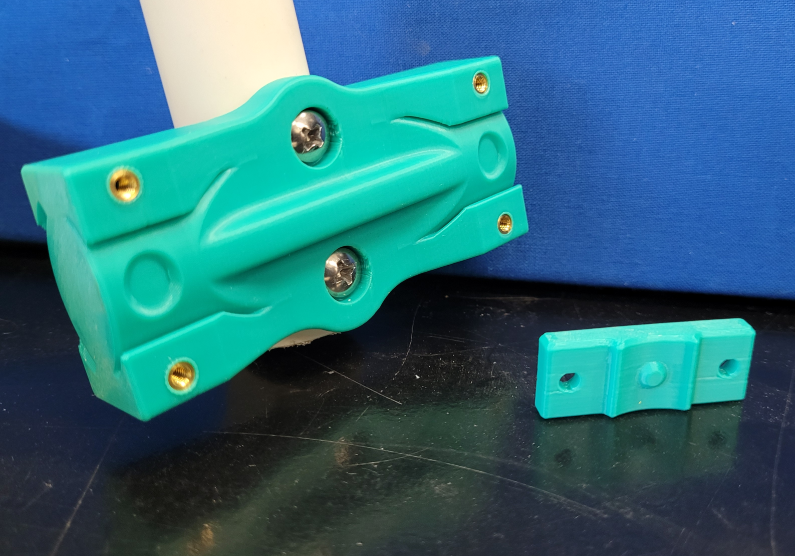 Photo 2. Bracket mounted to pipe.
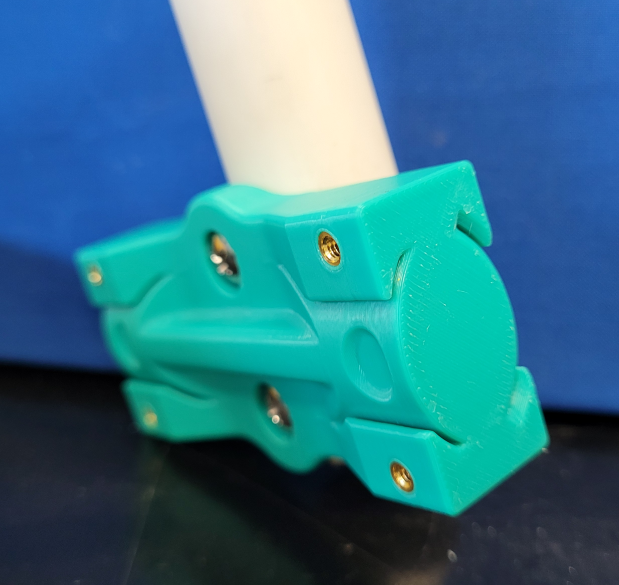 Photo 3. Side View of Bracket
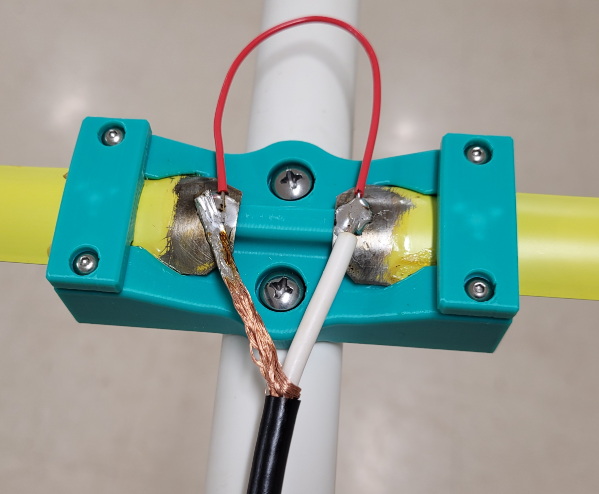 Photo 4. Close-Up of Driven Element with hairpin matching.
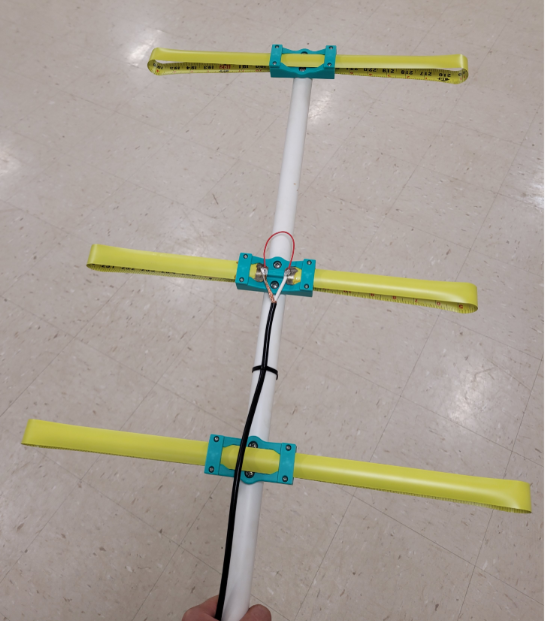 Photo 5. 3 Element Tape Measure Antenna with elements Folded.
Back to Top
Photo 5. 3 Element Tape Measure Antenna with elements Folded.
Back to Top